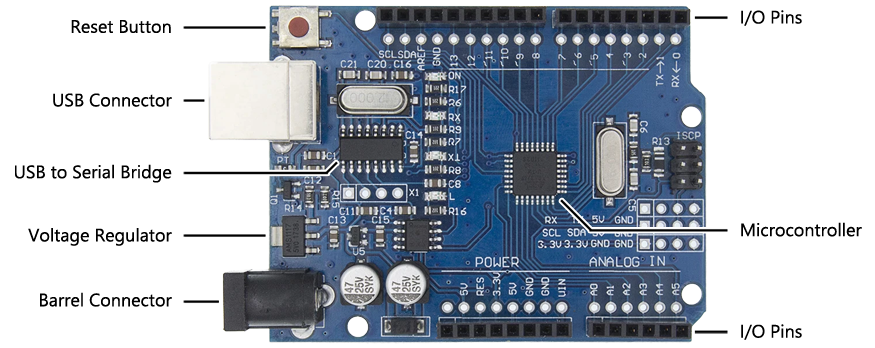
The Arduino Uno
The most important part in your kit is the Arduino Uno microcontroller board. A microcontroller is a very small computer that is inexpensive enough to be used for a single purpose, like a television remote control, quadcopter drone, or blood glucose meter. Contrast this with a general-purpose computer like a laptop or cellphone, which is much more powerful and expensive and can be used to do many more things. The Arduino can store and run exactly one program at a time, so every lab you do will require you to write and upload a new program to replace the previous one.
The name “Arduino Uno” refers to the board as a whole, which was designed by an organization that was founded in Italy. There are other boards in the family, like the Arduino Nano (which is smaller) and the Arduino Mega (which is more powerful). Although you can buy an official Arduino board from the Arduino website, the design is open-source and can be manufactured and sold by anyone. The Arduino Uno in your kit was manufactured by an unknown company in China and purchased for about one tenth the price of an official one.
The actual microcontroller on your Arduino Uno is a small integrated circuit (or “IC”, or “chip”) called the ATmega328P, made by a company called Microchip. It runs at 16 MHz (megahertz) and has 2 KB (kilobytes) of memory and 32 KB of storage. For comparison, a modern low-end laptop is about 150x faster (but 1,000x to 1,000,000x more powerful) with 2,000,000x the memory and 15,000,000x the storage.

Power: Your board must be powered, using either USB (from your PC or a phone charger) or the barrel connector (with the included battery pack). Without power the board will not work. When plugged into a PC using a USB cable the Arduino can also be programmed using the Arduino IDE.
Reset Button: If you press this it will reset the Arduino and restart your program. Downloading a new program to the board will also cause it to reset and start running the new program.
I/O Pins: Unlike PCs, which are designed to interface with humans, microcontrollers are designed to interface directly with electronics components like the other parts in your kit. To do this they have many input/output pins (or “I/O pins”) that can be controlled by your program to measure and generate electrical signals. For our purposes, a digital signal is either 5 volts (one, true, on, high, etc.) or 0 volts (zero, false, off, low, etc.), while an analog signal can be any voltage in-between.