Lab 7: Buttons
Buttons, or momentary switches, have two pins that become electrically connected while you are holding down the button. They can be connected to your Arduino in the same way as a switch, allowing you to use them as an input to your program.
Example Program
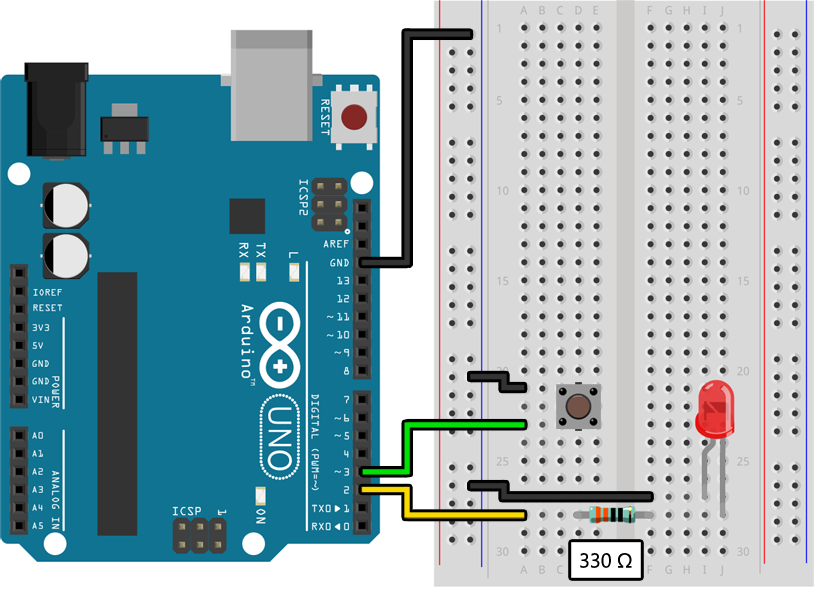
Assemble the following circuit and upload the program to your Arduino:
void setup()
{
    pinMode(2, OUTPUT);
    pinMode(3, INPUT_PULLUP);
}

void loop()
{
    if (digitalRead(3) == LOW)
    {
        // Turn on the LED when the button is pressed:
        digitalWrite(2, HIGH);
    }
    else
    {
        // Turn off the LED when the button is not pressed:
        digitalWrite(2, LOW);
    }
}
You should see the LED light up while you press the button and turn off when you release it.
Learn More
-
From an electrical standpoint a button is largely the same as a switch (Lab 2). Pin 3 is configured as an
INPUT_PULLUP, which means the internal pullup resistor is pulling the inputHIGHby default. When the button is pressed it becomes connected to ground, which overrides the pullup resistor and causes the input to read asLOW. -
The “click” you feel when you press the buttons in your kit is called haptic feedback. This type of button is very common in modern electronics, although it is often hidden behind a piece of plastic to create a larger, more pleasing button.
Assignment
Connect a piezo buzzer and at least 3 buttons to your Arduino and program it to play a different musical note on the buzzer while each button is held. If you pick the right notes (like C, D, and E) you can even play a simple song, like “Mary Had a Little Lamb” or “Hot Cross Buns”. Look at the end of the previous lab for a list of the frequencies of different musical notes.
Challenge
Instead of simply having each button correspond to a single note, program combinations of buttons to play different notes. You can play up to seven different notes with three buttons and up to 15 different notes with four buttons. With each button having two states (“pressed” or “not pressed”) this is just like a binary number. Look back at the deep dive after Lab 3 for more information about how to write complex if / else statements.