Lab 1: LEDs
Diodes are a type of semiconductor that only allow current to flow in one direction. They are useful, but not to us, and are not included in your kit.
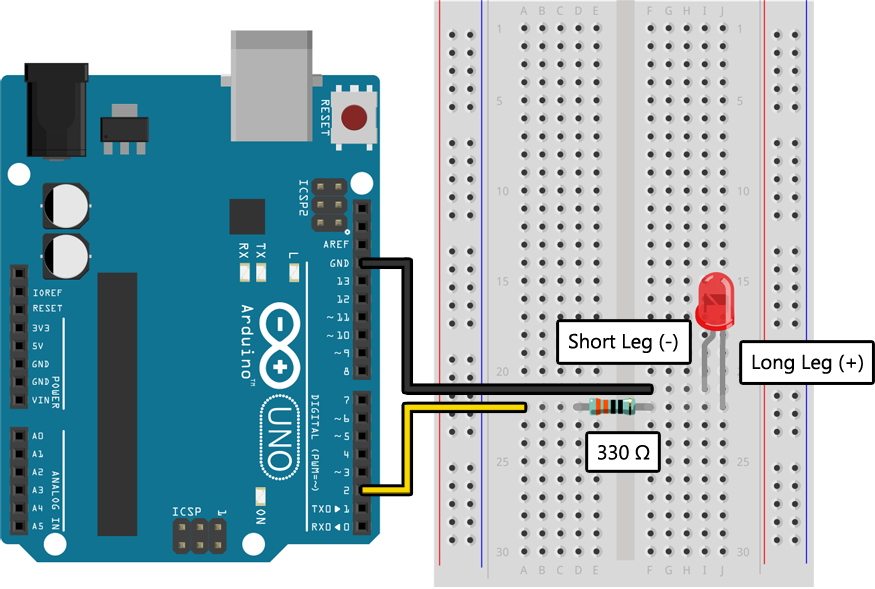
Light-emitting diodes (or “LEDs”), on the other hand, light up when current flows through them, which is much more fun. Unlike old-fashioned incandescent lightbulbs they do not limit the amount of current that passes through them, and so they must always be used in conjunction with a resistor so that they do not “burn out.” The LEDs in your kit have two “legs” of different length; the shorter leg should always be wired closer to ground (0 V or GND).
Resistors “resist” the flow of current and are used to limit the amount of current in a circuit. The amount of resistance of each resistor is measured in ohms (Ω) and is indicated by the difficult to read colored stripes on the resistor. Your kit contains two types of resistors (330 Ω and 10 kΩ) and a helpful card for telling them apart.
Example Program
Assemble the following circuit and upload the program to your Arduino:
void setup()
{
    pinMode(2, OUTPUT);
}

void loop()
{
    // Blink the LED on pin 2 once per second:
    digitalWrite(2, HIGH);
    delay(500);
    digitalWrite(2, LOW);
    delay(500);
}
If your program has uploaded without any errors you should see the LED blinking on and off once per second. If your LED is not blinking you may have it connected backward; verify that the longer leg is connected to pin 2 and the shorter leg is connected to ground (“GND”).
Learn More
-
By using a resistor in series with the LED you have limited the amount of current that will flow through it so that it will not “burn out.” Although it would be most precise to measure it with an ammeter (a device that measures current), you can estimate the amount of current flowing through the LED with Ohm’s law: V = I * R, so I = V / R = 5 V / 330 Ω = 15 mA. It is surprisingly difficult to identify the maximum current for generic LEDs like the ones in your kit, but anything below 20 mA is probably fine.
-
The
pinMode()function is used to set an I/O pin to either input mode (which measures voltages) or output mode (which generates voltages). In this example we set the pin toOUTPUTmode because we are using it to generate a voltage that will power the LED. -
The
digitalWrite()function is used to set the voltage generated by a pin configured forOUTPUTmode by a previous call topinMode(). Because it is a digital write there are two possible values:HIGH(5 V) andLOW(0 V). In this example we alternate between setting the pin toHIGHandLOWto make the LED turn on and off. -
The
delay()function is used to pause the program for a specified amount of time (in milliseconds). In this program, calls todelay()control the frequency at which the LED blinks by forcing the Arduino to wait between turning the LED on and off.
Assignment
Using the circuit and program above as a starting point, configure your Arduino to blink out your name in Morse code on an LED. An introduction to Morse code is provided below.
Your name probably has quite a few letters, and those letters probably have quite a few dots and dashes, and those dots and dashes probably require quite a few digitalWrite() and delay() calls. Check out the deep dives on the next pages for some hot C tips that can help make your programs less tedious to write (and better prepare you for the AP exam). At a minimum, consider creating a function for dots and a function for dashes, and use them to construct your Morse code message.
International Morse Code
- The length of a dot (•) is 1 unit.
- The length of a dash (−) is 3 units.
- The space between dots and dashes within a letter is 1 unit.
- The space between letters is 3 units.
- The space between words is 7 units.
| Letter | Morse Code | Letter | Morse Code | Letter | Morse Code |
|---|---|---|---|---|---|
| A | •− | N | −• | 0 | −−−−− |
| B | −••• | O | −−− | 1 | •−−−− |
| C | −•−• | P | •−−• | 2 | ••−−− |
| D | −•• | Q | −−•− | 3 | •••−− |
| E | • | R | •−• | 4 | ••••− |
| F | ••−• | S | ••• | 5 | ••••• |
| G | −−• | T | − | 6 | −•••• |
| H | •••• | U | ••− | 7 | −−••• |
| I | •• | V | •••− | 8 | −−−•• |
| J | •−−− | W | •−− | 9 | −−−−• |
| K | −•− | X | −••− | ||
| L | •−•• | Y | −•−− | ||
| M | −− | Z | −−•• |