Lab 5: RGB LEDs
An RGB LED looks a lot like a normal LED, except that it has four pins instead of two. They contain three independent LEDs (red, green, and blue) that can be turned on separately or together to create many different colors, like a pixel on a screen. If you turned on the red and blue LEDs at the same time the light would be magenta. If you turned on all the LEDs at the same time the light would be white. Each LED in the RGB LED is wired separately and needs its own current-limiting resistor to not “burn out.”

Example Program
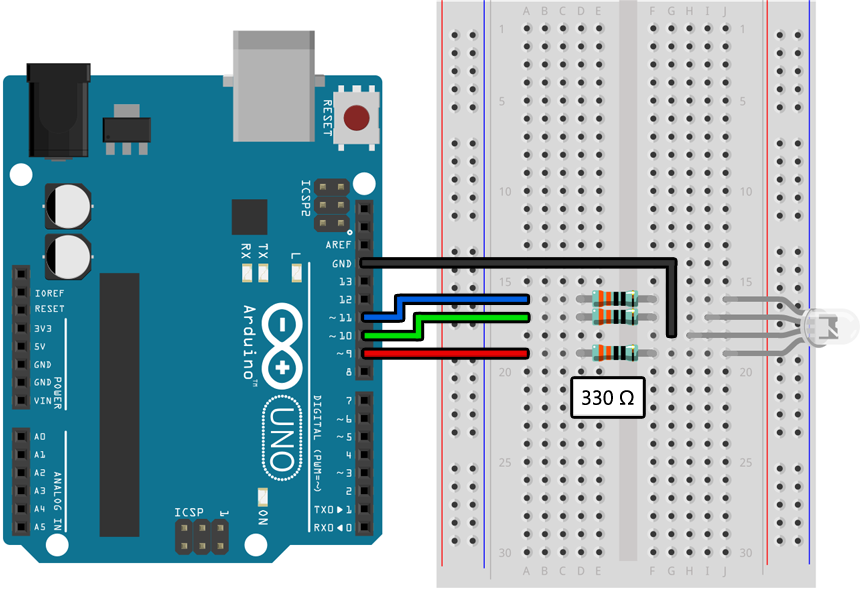
Assemble the following circuit and upload the program to your Arduino:

void setup()
{
    pinMode(9, OUTPUT);     // Red
    pinMode(10, OUTPUT);    // Green
    pinMode(11, OUTPUT);    // Blue
}

void loop()
{
    // Increase the brightness of the blue LED:
    for (int i = 0; i < 256; i++)
    {
        analogWrite(11, i);
        delay(4);
    }

    // Turn off the blue LED:
    analogWrite(11, 0);

    // Increase the brightness of the red LED:
    for (int i = 0; i < 256; i++)
    {
        analogWrite(9, i);
        delay(4);
    }

    // Turn off the red LED:
    analogWrite(9, 0);
}
Your RGB LED should alternate between red and blue, each time ramping up linearly from fully off to fully on over about a second. If you are seeing this but with the wrong colors it means you have hooked up the pins in the wrong order; check your wiring and try again.
Learn More
-
In previous labs we used
digitalWrite()to turn LEDs on and off. In this lab we are usinganalogWrite()to power LEDs at less than full brightness. Instead of writingHIGHorLOW, we write an integer value between 0 (fully off) and 255 (fully on). In the example above we use it to ramp up the brightness of red and blue separately, but you could (and will) also use it to blend between colors, like turning on 100% blue and 50% red to create a blueish-magenta color. -
Much like
analogRead(), theanalogWrite()function is very particular about which pins it can be used with. If you consult the table in Lab 2 you will see that it can only be used on pins 3, 5, 6, 9, 10, and 11. This is also indicated on the Arduino itself by a “~” symbol next to the pin number. -
Although this lab has you using
analogWrite()with RGB LEDs, you can also useanalogWrite()with single-color LEDs. In real-world electronics this is a common way to vary the power of analog devices like lights and motors when using a microcontroller. -
If
analogRead()measures a continuous analog value between 0 V and 5 V, doesanalogWrite()generate a continuous analog value between 0 V and 5 V too? Not quite! For a proper explanation check out the deep dive into pulse-width modulation (or “PWM”) on the next page.
Assignment
Create a circuit that blends the output of an RGB LED between two different colors as a potentiometer is turned from one end to the other. You can choose whatever colors you want, but they need to be distinct enough that the color blending is clearly visible.
Although it is possible to do the math yourself, this is a great opportunity to use the map() function to convert a value from one range to another. As you learned in Lab 3, the analogRead() function returns a value between 0 and 1023. If you wanted to remap this to a smaller range, say from 0 to 255, you could use the following code instead, which returns the remapped value and could be stored in a variable or passed to another function:
map(analogRead(), 0, 1023, 0, 255)
A full explanation of the map() function is available here, but a quick list of the parameters follows:
map(value, fromLow, fromHigh, toLow, toHigh)
Challenge
Hook up your second potentiometer and use it to vary the brightness of the RGB LED between 0% and 100%, and have it work correctly for the full range of input from the potentiometer that sets the color. You will need to add additional calls to map() to make this work.