Lab 6: Piezo Buzzers
Like all speakers, piezo buzzers convert an electrical signal into physical vibrations that vibrate the air to create sounds that we can hear. Most speakers (like the kind in a phone, stereo, or car) use electromagnets, which use a lot of power and are difficult to control. Piezo buzzers use small crystals that vibrate when voltage is applied and are so low power that they can be connected directly to an I/O pin on an Arduino.
Example Program
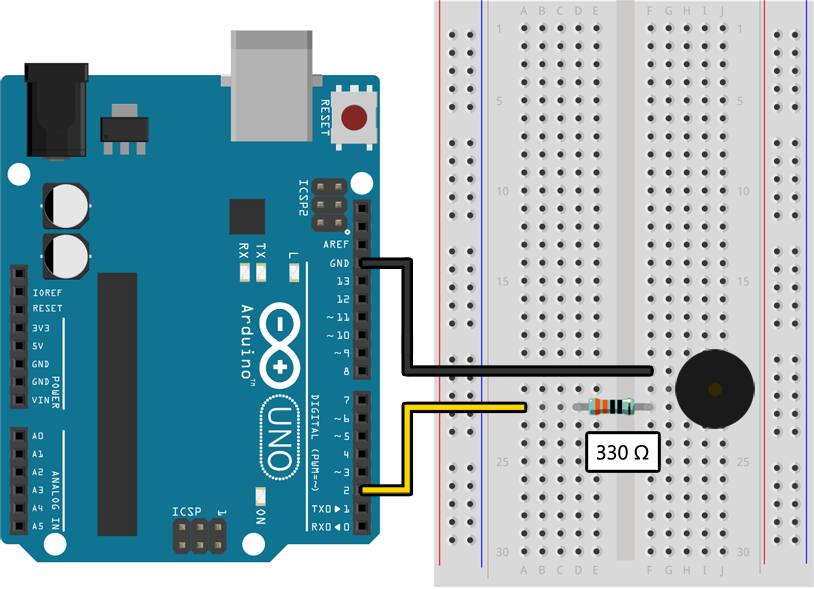
Assemble the following circuit and upload the program to your Arduino:
void setup()
{
    pinMode(2, OUTPUT);
}

void loop()
{
    // Play a 554 Hz (C#) tone for 250 ms:
    tone(2, 554);
    delay(250);

    // Play a 440 Hz (A) tone for 250 ms:
    tone(2, 440);
    delay(250);

    // Silence the buzzer for 500 ms:
    noTone(2);
    delay(500);
}
You should hear the piezo buzzer repeatedly play two tones (C# and A) with a delay between repetitions. If you put a small piece of clear tape over the top of the buzzer it will greatly improve the sound quality and make it easier to hear. If the piezo buzzer is still too quiet, or for some reason you just want it to be really loud, you can remove the resistor and directly connect the piezo buzzer between pin 2 and ground. Just do not ever do this with an LED!
Learn More
-
When the
tone()function is called the Arduino will begin turning the specified pin on and off at the specified frequency. In our example above,tone(2, 440)tells the Arduino to turn pin 2 on and off at 440 hertz. Thetone()function is similar todigitalWrite()in that it expects the pin to be configured as anOUTPUTpin, which we do usingpinMode()insetup()above. -
To change the tone being played on a pin you can simply call
tone()again with the same pin and a different frequency. There is no need to stop it first. To silence the tone being played on a pin you should call thenoTone()function as shown in the example above. -
The
tone()function can only be used to play a single note at a time. If you start playing a note it will stop any previously playing notes, even if they are on a different pin. By using the external Tone library, however, you can play up to three notes at once using three separate piezo buzzers.
Assignment
In this assignment you will create a program that plays a song on a piezo buzzer. If you were to write this out naively you would have far too many tone() and noTone() calls, so you will implement the following function to play a specific note for a specific duration of time:
void playNote(int frequency, int beats)
{
    // Play a note with the specified frequency and number of beats.
    // If the frequency is 0, rest for the specified number of beats instead.
}
If you have implemented that correctly, you will then be able to make the following function calls in your loop() function to play a song that will hopefully be familiar to you. For the song to sound correct, the length of a beat should be about 150 ms.
void loop()
{
    playNote(415, 1); // A♭
    playNote(466, 1); // B♭
    playNote(554, 1); // D♭
    playNote(466, 1); // B♭
    playNote(698, 3); // F
    playNote(698, 3); // F
    playNote(622, 4); // E♭
    playNote(0, 2);   // Rest
    playNote(415, 1); // A♭
    playNote(466, 1); // B♭
    playNote(523, 1); // C
    playNote(466, 1); // B♭
    playNote(622, 3); // E♭
    playNote(622, 3); // E♭
    playNote(554, 4); // D♭
    playNote(0, 2);   // Rest
    playNote(415, 1); // A♭
    playNote(466, 1); // B♭
    playNote(554, 1); // D♭
    playNote(466, 1); // B♭
    playNote(554, 3); // D♭
    playNote(0, 1);   // Rest
    playNote(622, 2); // E♭
    playNote(523, 4); // C
    playNote(415, 3); // A♭
    playNote(0, 1);   // Rest
    playNote(415, 2); // A♭
    playNote(622, 4); // E♭
    playNote(554, 4); // D♭
    playNote(0, 4);   // Rest
}
So that you can verify your program is correct, here is a video of the song being performed.
To make your music sound more natural (if that is even possible with a piezo buzzer) try adding a very small delay at the end of your playNote() function so that sequential notes do not run together.
Challenge
Instead of using the song above, write a program that plays a song of your choice. You will need to convert the musical notes into frequencies and beats. The following diagram is a little intense but lists the frequency of every note on a piano keyboard:
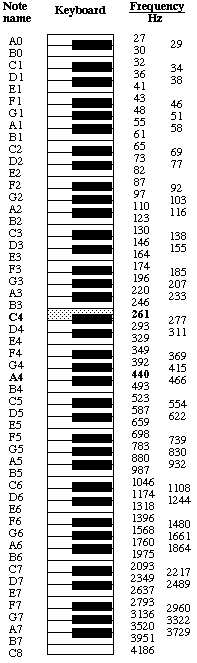
Doubling a note’s frequency moves it up exactly one octave, while halving the frequency moves it down an octave. This is one of many mathematical relationships found in music theory.