Lab 2: Switches
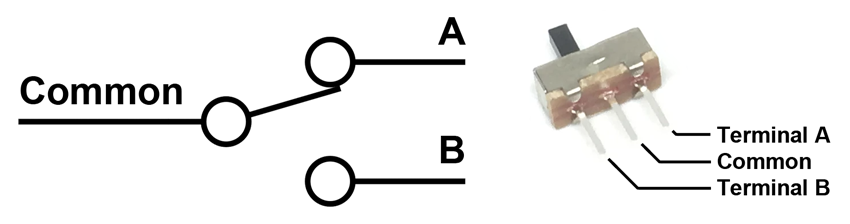
A switch is an electrical component that changes the path of electricity through a circuit as it is moved between different physical positions. The particular switch in your kit is known as a “single-pole, dual-throw” (SPDT) switch because it switches a single circuit between two terminals.
Example Program
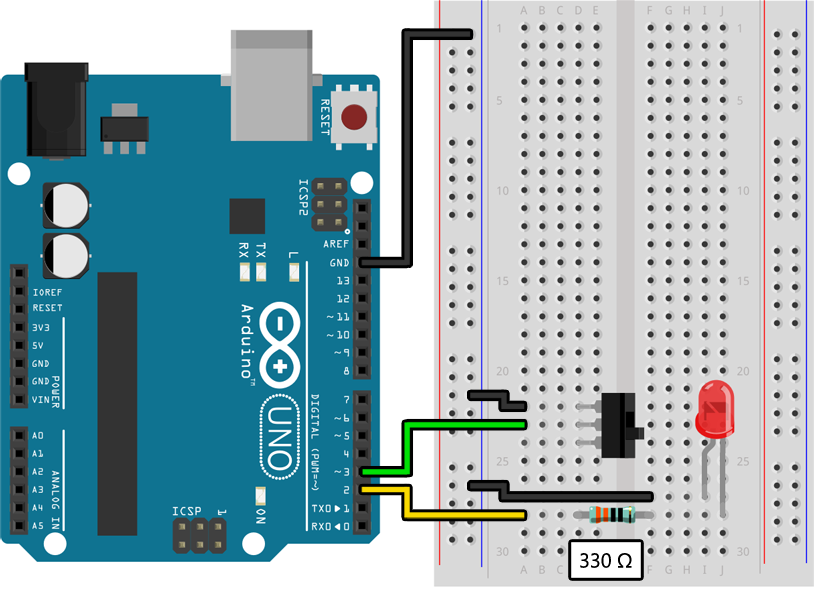
Assemble the following circuit and upload the program to your Arduino:
void setup()
{
    pinMode(2, OUTPUT);
    pinMode(3, INPUT_PULLUP);
}

void loop()
{
    if (digitalRead(3) == LOW)
    {
        // The switch is on, so blink the LED on pin 2 quickly:
        digitalWrite(2, HIGH);
        delay(100);
        digitalWrite(2, LOW);
        delay(100);
    }
    else
    {
        // The switch is off, so blink the LED on pin 2 slowly:
        digitalWrite(2, HIGH);
        delay(200);
        digitalWrite(2, LOW);
        delay(200);
    }
}
Your LED should be blinking at a rate determined by the position of the switch, with one position causing it to blink twice as fast as the other position.
Learn More
-
Just like in the previous lab we are using
pinMode()to configure pin 2 as anOUTPUTthat can turn an LED on and off. We are also doing something new, however, and hooking up a switch to pin 3 so that we can use it as an input. This is done by setting the pin mode toINPUT_PULLUP. -
Similar to how we used
digitalWrite()to control an output pin and set it toHIGHorLOW, we can usedigitalRead()with an input pin and it will return eitherHIGHorLOWdepending on the voltage measured by the pin. By configuring a pin forINPUT_PULLUPit will beHIGHby default (due to something inside the microcontroller called a pullup resistor) and will change toLOWwhen the pin is connected to ground by the switch. -
By combining
digitalRead()withif/elsestatements we can run different code depending on the state of an input. In the example above we blink quickly with a 100 ms delay when the switch is “on” (i.e. connected to ground) or blink slowly with a 200 ms delay when the switch is “off” (i.e. not connected to ground). Although you will not necessarily need it for this lab, there is a deep dive forif/elsestatements in the next lab with more information. -
This code is a little verbose and could be improved using variables. Look a few pages ahead for a deep dive into how variables work in C and how they could help.
Assignment
Create an interesting animation using at least five LEDs that changes in a meaningful way when a switch is toggled. For example, you could have an animation that cycles between the five LEDs in sequence but goes in reverse when the first switch is toggled.
None of our examples so far have shown you how to hook up more than one LED or switch. The way to do this is simple: copy the wiring for a single component as many times as you need but use a different I/O pin on the Arduino so that you can “talk” to each of the components separately. Check out the deep dive on the next page for instructions on how to use choose which I/O pin to use.
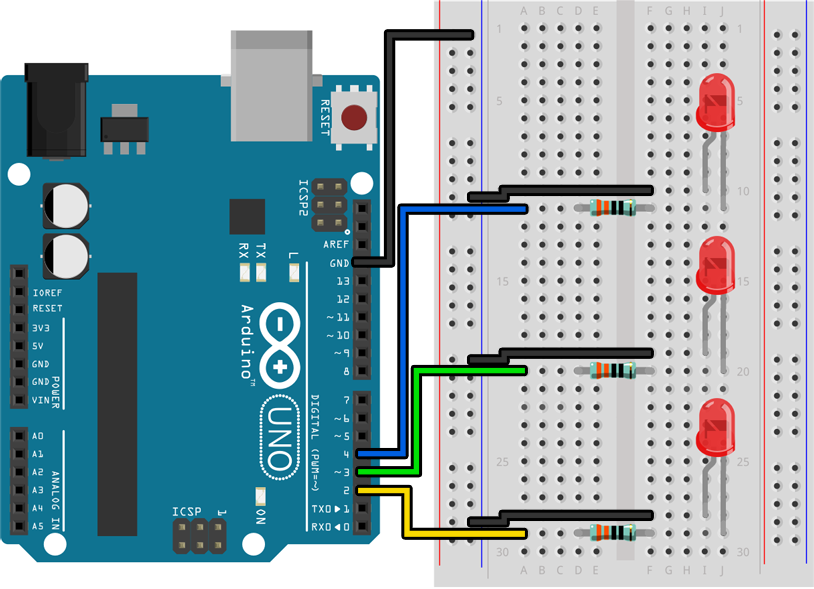
In the example diagram below we have hooked up three LEDs to pins 2, 3, and 4. Each LED is hooked up in the same way as Lab 1 (I/O pin → 330 Ω resistor → LED → GND) except that we have used three different I/O pins so that the LEDs can be turned on and off independently. We have also used the ground rail to connect the LEDs back to GND without having to use all three GND connections on the Arduino, two of which are on the other side of the board and are hard to reach.
Challenge
Add a second switch to your circuit that changes the behavior of both of your animation modes. For example, if you made an animation that cycles the LEDs in forward or reverse, your second switch could toggle between normal speed and double speed for either direction.