Lab 11: Touch Sensor
Although it looks nothing like a phone, this touch sensor uses the same general principle as a phone’s touch screen: capacitive touch sensing. When you touch it you in essence become part of the circuit, not through normal conduction (because then it would be electrocuting you!) but by becoming part of the capacitor and changing its capacitance.
Example Program
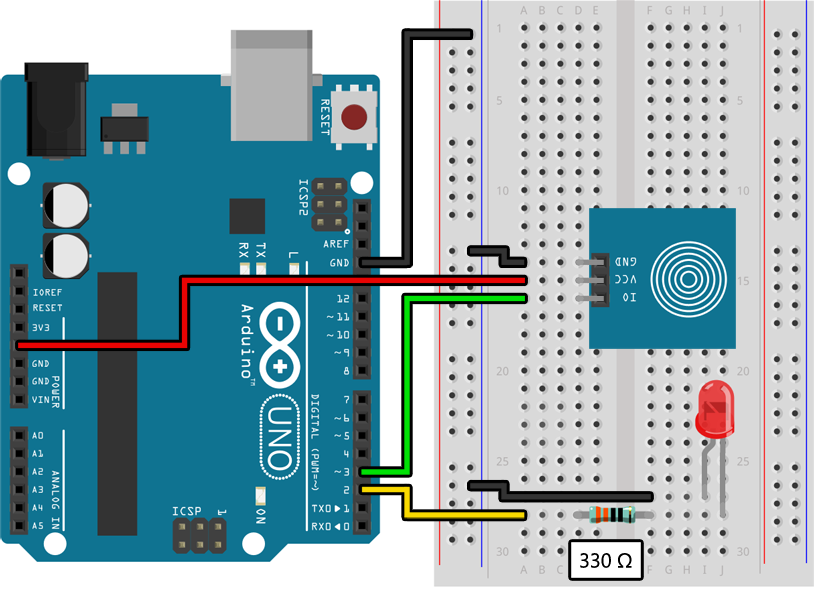
Assemble the following circuit and upload the program to your Arduino:

void setup()
{
    pinMode(2, OUTPUT);
    pinMode(3, INPUT);
}

void loop()
{
    if (digitalRead(3) == HIGH)
    {
        // Turn on the LED when the touch sensor is touched:
        digitalWrite(2, HIGH);
    }
    else
    {
        // Turn off the LED when the touch sensor is not touched:
        digitalWrite(2, LOW);
    }
}
The LED should turn on when you touch the circular area on the touch sensor and turn off when you stop touching it.
Learn More
-
The touch sensor is a lot like a button or a switch, except that you should use
INPUTinstead ofINPUT_PULLUPwhen configuring the pin. Unlike a button that connects to ground when pushed and is disconnected when not pushed, the touch sensor always puts out aHIGHorLOWsignal for the Arduino to read. Thus, no need for the pullup. -
The touch sensor is also unlike a button or switch because
digitalRead()will returnHIGHwhen you are touching the sensor andLOWwhen you are not.
Assignment
Using an LED connected to an analogWrite() compatible pin and a touch sensor connected to any other I/O pin, create a circuit for a “touch-sensitive lamp” that changes brightness when you touch it. Touching it once should turn the light on to about 33% brightness, touching it again should increase the brightness to 66%, touching it again should turn it all the way on, and touching it again should turn it off so that the process can be repeated.
Although the circuit for this assignment is easy, the code is not. In all the other labs with buttons and switches we only cared if a button was held down. In this assignment we care about when the touch sensor changes state, from released to pressed. In order to do this we will need to remember the previous state of the touch sensor using a variable. Fortunately, HIGH and LOW can be treated as integer values and stored in an int.
The following code, when combined with the example circuit in this lab, blinks the LED whenever the touch sensor goes from released to pressed or pressed to released (that is, whenever the touch sensor changes state):
int previousState = LOW;

void setup()
{
    pinMode(2, INPUT);
    pinMode(3, OUTPUT);
}

void loop()
{
    // Determine whether the touch state has changed:
    int currentState = digitalRead(2);
    if (currentState != previousState)
    {
        // Check against this new state from now on:
        previousState = currentState;

        // Quickly blink the LED on pin 3:
        digitalWrite(3, HIGH);
        delay(100);
        digitalWrite(3, LOW);
    }
}
You will most likely also need to use a variable to store the current brightness so that you can increment it when the button is pressed. An int will be sufficient for this too.