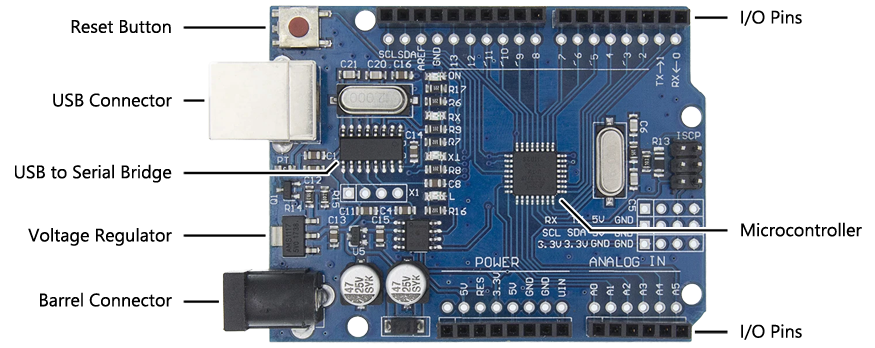
The most important part in your kit is the Arduino Uno microcontroller board. A microcontroller is a very small computer that is inexpensive enough to be used for a single purpose, like a television remote control, quadcopter drone, or blood glucose meter. Contrast this with a general-purpose computer like a laptop or cellphone, which is much more powerful and expensive and can be used to do many more things. The Arduino can store and run exactly one program at a time, so every project you build will require you to write and upload a new program to replace the previous one.
The name "Arduino Uno" refers to the board as a whole. There are other boards in the family, like the Arduino Nano (which is smaller) and the Arduino Mega (which is more powerful). Although you can buy an official Arduino board from the Arduino website, the design is open-source and can be manufactured and sold by anyone.
The actual microcontroller on your Arduino Uno is a small integrated circuit (or "IC", or "chip") called the ATmega328P, made by a company called Microchip. It runs at 16 MHz (megahertz) and has 2 KB (kilobytes) of memory and 32 KB of storage. For comparison, a modern low-end laptop is about 150x faster (but 1,000x to 1,000,000x more powerful) with 2,000,000x the memory and 15,000,000x the storage.
Arduinos, like all computers, are controlled by writing programs. A program is a written sequence of instructions that the computer follows, generally from top to bottom. Programs are written using programming languages which, like normal languages, have words that must be used and rules that must be followed. Your Arduino is programmed using C++, which is popular and powerful but also complicated and challenging to learn.
To make learning and writing C++ easier, a block-based visual "code builder" has been provided here. You can use this tool to build Arduino programs in your browser.
When you're ready to test your program, copy the C++ code from the right side of the screen into the Arduino IDE and upload it to your Arduino.
Any code that comes after two forward slashes (//) is called a comment. Here is an example:

// Hello, this is a comment!
Comments don’t do anything and are ignored by the computer, but they let you leave notes in your programs so that other people can better understand them.
In this tutorial, comments will be used in example programs to help explain them. You should use comments in your programs to explain what you are trying to do.
This is the shortest possible Arduino program:

void setup()
{
    // Code that you put here will only run once.
}

void loop()
{
    // Code that you put here will run repeatedly.
}
When you create your own programs you will start with this template and then add more code between the curly braces ({ and }) after setup() and loop().
Code that comes after setup() will only run once. This is where you will do any one-time setup that your project requires.
Code that comes after loop() will run over and over again. This is where you will put most of your code.
Throughout this course you will use the USB cable to send text from your Arduino to your computer, which can then be viewed in the Arduino IDE’s serial monitor.
Connect your Arduino to your computer and upload the following program:
void setup()
{
// This MUST be in setup() if you want to use the serial monitor:
Serial.begin(9600);
}
void loop()
{
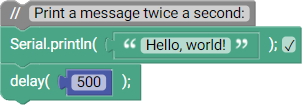
// Print a message twice a second:
Serial.println("Hello, world!");
delay(500);
}
If you open the serial monitor in the Arduino IDE ("Tools > Serial Monitor", or Ctrl+Shift+M) you should see the text Hello, world! printed to the screen twice each second.
In the above example, we used the following to pause between lines of text:
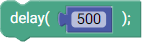
delay(500);
The number in the parentheses (( and )) is the number of milliseconds to pause for. There are 1000 milliseconds in a second, so this pauses for half a second.
You can add more code to loop() to make a more complex program, like this program that prints a five second countdown:
void setup()
{
Serial.begin(9600);
}
void loop()
{
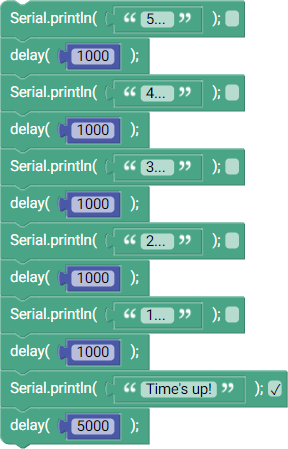
Serial.print("5... ");
delay(1000);
Serial.print("4... ");
delay(1000);
Serial.print("3... ");
delay(1000);
Serial.print("2... ");
delay(1000);
Serial.println("1... ");
delay(1000);
Serial.println("Time's up!");
delay(5000);
}
If you upload this program to your Arduino you'll see that it prints out the following, with a one second delay between the numbers and a five second delay between repeats:
5... 4... 3... 2... 1...
Time's up!
Whether or not the text starts on a new line depends on whether Serial.print() (same line) or Serial.println() (new line) is used.
Using the above program ("Printing more text") as a starting point, create a program that prints a terrible dad joke to the serial monitor.
Use delay() to ensure that your joke has the correct comedic timing, with an appropriate pause between the joke and the punchline.
When you've finished that, make it more complicated. You might add animated dots between the joke and the punchline to build up the suspense for someone watching, or you might add multiple lines of text to create a dialogue between two characters. Remember that you can use Serial.print() to print text without automatically starting a new line.
Two antennas meet on a roof.
They fall in love and get married.
The wedding was boring... but the reception was great.